[Nintendo Switch] AliExpress Knockoff RCM x86 - Install and Review (May 2024)
TL;dr: DON'T BUY MODCHIPS FROM ALIEXPESS. (Unless you're dirt poor and feeling lucky.)
I just had a mixed experience with an odd knockoff RCM x86 from AliExpress, and because I couldn't find much about them online, I wanted to share my experience, findings, and suggestions regarding this little chip. If I've left something out or gotten something wrong, please comment!
") |
| My install (not shown: kapton tape) |
I won't link the shop here, but here is the listing I ordered from AliExpress:
 |
| Not what came in the mail... |
The item shown on the listing is different than the one I received. The one I ordered had pads labeled "D+ D- 4 3 2 1 D0" on one side, and 5 pads on the other. This implied full support for all straps (RCM, Vol +, and USB) and UF2 firmware flashing (through use of the RESET pin and the Switch's USB C connector). It also showed a magnet switch and thin wire as included. While I did get the wire (seen in the install), I didn't get a magnet switch. (That's just as well, later I mention how it probably wouldn't have done anything anyway.)
I have seen knockoff x86 chips like mine (with the limited and oddly labeled pads) around online in various install pictures, but most said "x86" where mine says "DDDZ". It seems that these DDDZ chips come mainly from AliExpress vendors. It seems to be a growing trend to show "legitimate"looking chips only to sell these instead. (Maybe these board design files were re-purposed from some other product that uses almost identical boards for handling USB interfacing.)
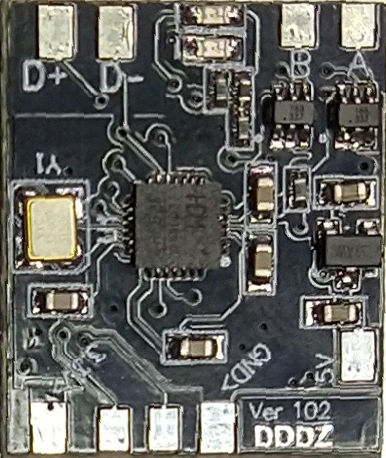 |
| "Where did I come from?" -DDDZ v102 |
So now we've established that this... thing... isn't really an RCM x86, but at the very least you would expect it to work like an x86 would. So, how well does it hold up on features?
Overall, it kinda works! But definitely not like a "real" x86 that has the extra pads. It will get you into Hekate, but it's a pretty inflexible setup. I'll explain.
Out of the gate, the pinouts don't match up with any of the guides you'll find online. So the question an installer must ask is "what pads do what, and which wires go to them". Some pads are labeled on the board, some aren't, and some are labeled but with the the letters A and B instead of numbers or names like an x86 does.
I'll save you the trouble, I've put together a pinout diagram to the best of my understanding:
 |
| "DDDZ" RCMx86 Knockoff Pinout |
While I have found pad B to be a functional joy-con RCM strap, It's unclear if this DDDZ chip and similar x86 knockoffs support the Vol + and USB straps. I assume the "A" pad is the Vol + pad, but I am pretty sure the USB strap is fully unsupported.
There are 4 SMD pads on the bottom of the chip that could short out against the metal plate in the Switch, so I put electrical tape over the back and cut it down flush to the sides. I also used a couple layers of kapton on top of the chip (not shown) before reinstalling the metal backing.
 | |||
| The back of the board, with insulation for those pads. |
I have tried using the labeled "RES" pad(s?) (label is on underside of board) in every configuration of shorted to ground or each other, with no reset or change in chip behavior. This probably means the chip cannot be re-flashed with alternate UF2 files. It came with Hekate 6.0.2, so at the very least it's a somewhat recent and very usable payload. I'm loading Hekate 6.1.1 from my SD card with it without issues.
When booting into OFW via the power button alone (no Vol +), the chip still boots, pulls the RCM strap down, and waits for RCM mode. Because this never happens, the chip keeps the RCM pin on the right joy-con rail shorted indefinitely, which makes it so the right joy-con cannot work while attached to the console.
 |
| No more A button, or B, or X, Y, R, ZR, Home... |
The only way to get the right joy-con to work attached on OFW is to launch "Stock" OFW from Hekate. That way, the chip finishes injecting, disconnects all of it's straps, and goes to sleep.
Even though booting into OFW from the power button alone isn't fully functional with this chip (no right joy-con), I chose to not install the Vol + strap. This is because, in the event that my switch battery fully dies, I want the default behavior of booting into OFW (with it's fast-charge battery management) instead of having my modchip constantly try and run interference with me. This way, as long as I personally never hit the Vol+ button, the switch cannot enter RCM mode, and I can easily charge it up again.
So using this chip like I have done gives you 3 modes and no other options:
- OFW without the right joy-con attached (power button only, or default boot behavior when plugged in)
- CFW through Hekate (power & Vol +)
- OFW through Hekate (power & Vol +)
- Proper dual boot support
- USB disconnect strap support
- UF2 flashing via USB flash drive mode
I plan on eventually swapping this out with a legitimate x86 that I will then update to the latest firmware from mattytrog's GitHub. I plan on installing all the straps and using dual-boot managed by the modchip. However, until I get the time and money to do so, I'm actually pretty pleased with having to use this crappy little knockoff. I can't deny the elegance and convenience of having all parts of the exploit process crammed inside my Switch itself.
 |
| I'm just glad I didn't fry anything. 😅 |
One final note for eagle-eyed readers: Yes, I did have a very bad time trying to get the 3.3v line tapped off the capacitors. Yes, they got shorted out with a small wire hidden underneath a solder blob. Yes, it took about 3 hours of Sisyphean effort trying desperately to wick solder away from the short before I realized there was a wire in there and used tweezers to push it out. Yes, I cried because I thought I just killed all my Animal Crossing villagers. But then, I removed that short, said "fuck the capacitor bullshit", and took 3.3v off an alternate point on the eMMC board. And in the end, look at that totally sane smile that says "I am happy and twitching with stress!"


Comments
Post a Comment